Just like how the electric company needs to read the electric meter on your home, your office technology provider periodically needs to take the meter reading on your copier. Doing so not only helps your copier vendor know how to properly bill your organization, it also helps them keep tabs on your system and its usage to make sure you are getting the optimal experience from it.
Based on your billing cycle, your office technology solutions provider will routinely ask you for a meter reading.
Sometimes, however, getting the meter off your copier or multifunction copier and printer (MFP) seems like quite the trick with all of those panels and buttons and such.
Here are some step by step instructions, both written and video, for four copier manufacturers.
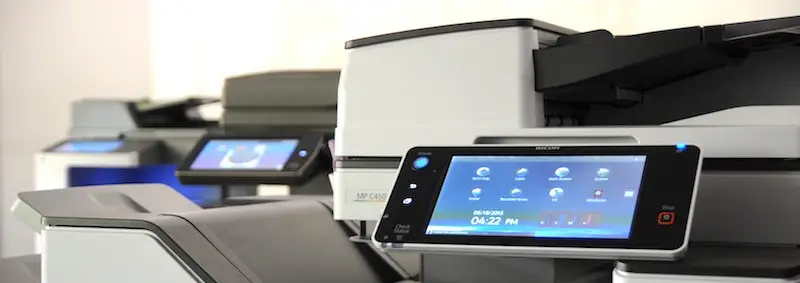
Getting the meter on your Ricoh copier:
On your Ricoh copier system, to retrieve the meter count you’ll want to locate the “User Tools/ Counter” button, located either on the right side or on the left top corner of the control panel, and press that. If you have the tablet interface, you’ll just want to swipe right, locate the “User Tools” button and press on that.
This will take you to your general settings home page. From there just click on “Counter” which is located in the bottom right corner. This will display your meter reading.
For your black-and-white systems, you will just need the black-and-white total count. If a color system, you will need both the black and white count as well as a color count. For a hard copy of your meter reading, on the bottom right corner of the same screen, press “Print Counter List” and then hit your Start key to print.
Now you have your meter reading.
Getting the meter on your Sharp copier:
For your Sharp copier system, to retrieve the meter count just click on the “Settings” icon on the touchscreen display. Then on the left menu bar, you’ll select “System Settings.” From there, it will display your meter reading.
You can print a hard copy by just clicking “Print.”
If you have a black and white system, you will just need your black-and-white total. If a color system, you will need your black-and-white total and your color total.
Getting the meter on your Kyocera copier:
For your Kyocera system, to retrieve the meter count you’ll just want to locate the “Counter” button on the control panel. From here, your copier screen will display your meter reading.
You can print off a copy by going pressing the “Print Status Page” button on the screen, and clicking “Yes.” Now you have a hard copy.
If you have a black and white system, you will just need your black-and-white total. If a color system, you will need your black-and-white total and your color total.
Getting the meter on your Lexmark copier:
For your Lexmark system, to retrieve the meter count you will want to click on your menu options button located in the bottom right corner. From there you’re going to click on “Reports” and then you’re going to choose “Device Statistics”. It will immediately print out your meter reading page.
The page will give you a ton of information, but what you are looking for listed underneath “Media Printed Side Count,” you will look for under “Total”. You will only need the “Mono” total if you have a black-and-white system. But if you have a color system, you will need the “Mono” total and the “Color” total.
Hopefully, this helps you easily gather your meters from your copiers.
From time to time, your system will request for you to change your consumables and this includes you toner and as well as your waste toner bottles.
Here is how to change the waste toner bottle on a Sharp MX series copier — specifically the 4110, 4111, 4140, 4141, 5111, 5140 and 5141.
Your system will prompt you whenever your waste toner bottle is close to being full.
See an alert? Don’t worry. Just call.
When you receive that notification, call your office technology supplier to let them know you will need a new waste toner bottle replacement. Once you do this, you should receive your new bottle in a few days. For RK Black clients, the waste toner bottle will arrive in one to two business days.
Just so you know, the Sharp system will continue operating and printing as normal until the system is completely full at which point it will pause printing, giving you a prompt, asking you to swap out the old bottle for a new one.
If you’ve got a print job in the queue when this happens, don’t worry. As long as you don’t turn your Sharp copier off, you will not lose the jobs in the queue. Your Sharp copier will maintain the queue so once the waste toner bottle replaced, the printing will begin where it left off.
?
Replace the old toner bottle with the new
Once that bottle arrives, you are then ready to exchange the full waste toner bottle with new empty bottle.
When you are ready to make the swap, simply open Sharp copier’s front cover. The waste toner bottle is the black box located underneath the toner cartridges.
To remove the waste toner bottle, press the lime green button. This will cause the top of the bottle to pop away from the machine to you can remove it. From there, just lift the bottle out of the system but taking care to not shake or jostle the bottle as there are open toner ports across the top. Pro tip: Sharp has designed the bottle so you can unstick the flaps near the ports cover the ports to minimize the mess. Another best practice though is to take the bottle and to place and seal it in a trash bag.
That way if something happens and the bottle gets shaken or dropped, you won’t have toner go everywhere — or what we call a “toner party.” They are no fun.
Now that you have the old bottle out and safely secured, the next step is to add the new empty waste toner bottle to the system. There’s nothing extra you need to do to prepare it for the system. Just remove it from the box, make sure the toner ports are at the top, locate the box sockets (hinge points for the toner bottle) in the system, match the bottom of the bottle to those sockets and place it in at an angle. Then just press the top in until it clicks, showing it has locked in position. Then just replace the front cover.
Then, just close the door.
That’s it!
Congrats!
You’ve replaced the waste toner bottle on your Sharp copier and you are ready to go!
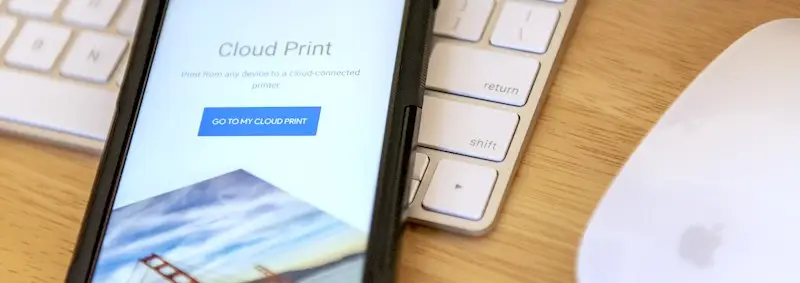
All good things must come to an end and such is the case for Google Cloud Print — Google’s cloud-based printing solution.
Google to end Google Cloud Print support
November of last year, Google announced their intent to discontinue support of Google Cloud Print, a utility that allows users to connect their home and work printers to the web, making it possible to print from anywhere using any Internet-connected device, inclusive of smartphones, tablets and other mobile devices.
As such, beginning on Jan. 1, 2021, devices across all platforms will not be able to use Cloud Print.
Don’t worry! Google offers alternatives
So for those of you using Google Cloud Print and wondering what to do, don’t worry! There are some options, one of which, we at RK Black specialize in.
Here’s the scoop …
While Google recommends a number of various alternatives to Google Cloud Print, among them some native printing options as well as solutions provided by third-party cloud-printing providers, they specifically point to PaperCut’s Mobility Print utility.
Check out PaperCut Mobility Print as a Google Cloud Print alternative
With PaperCut Mobility Print, you can easily discover and set up printers, regardless of the operating system or device manufacturer. It works in mixed environments of Chrome, Mac, Windows or Android operating systems, mobile or PC. What’s more is that it’s free!
While the fact that PaperCut Mobile Print is free is always good, what is better is the fact Google recommends it. It speaks volumes that Google chose PaperCut.
We all agree that it is great that PaperCut Mobile Print is offered at no charge! What makes it even better is that Google chose PaperCut because their platform offers additional, valuable options that allow fleet management, user and device management and cost cutting controls.
The truth is that no one helps manage print in any environment like PaperCut. Their offerings are leading the industry when it comes to simplifying processes, improving productivity, cutting print costs and allowing simple yet robust management of devices and users throughout an organization.
Talk to us
RK Black is a Premier Papercut Partner in Oklahoma and Kansas and has more trained/certified team members than any other dealer in either state. So, if you need help with setting up Papercut Mobile Print as a replacement for the outgoing Google Cloud Print, we can help you with that and more! Just reach out to us or to me specifically, and we’ll give you a hand.
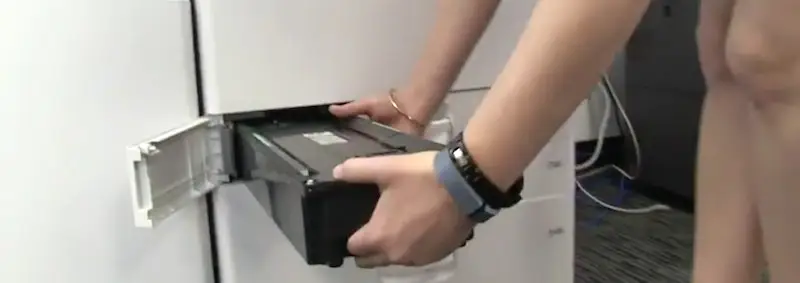
From time to time, your Ricoh copier system will request for you to change your consumables and this includes you toner and waste toner bottles.
Here is how to change the waste toner bottle on a Ricoh 03 and newer 04 series copier.
The great thing is, your system will alert you whenever your waste toner bottle is approaching being full. It will have an alert that will prompt you on the lower left-hand corner of the touchscreen display.
See an alert? Don’t be alarmed. Just make the call.
When you see that notification, call your office technology supplier to let them know you will need a new waste toner bottle. Once you do this, you should receive your new bottle in a few days. For RK Black clients, the waste toner bottle will arrive in one to two business days.
Just so you know, the Ricoh system will continue operating and printing as normal until the system is completely full at which point it will suspend printing, giving you a prompt, asking you to swap out the old bottle for a new one.
?
If you’ve got a print job in the queue when this happens, don’t worry. As long as you don’t turn your Ricoh copier off, you will not lose the jobs in the queue. Your Ricoh copier will maintain the queue so once the waste toner bottle swap is completed, the printing will begin where it left off.
Out with the old. In with the new.
Once the new, empty waste toner bottle arrives, you are then ready to exchange the full waste toner bottle with new empty bottle.
When you are ready to make the swap, simply open the door you’ll find immediately to the left of tray 1 and above trays 2 and 3. Behind that door you will find a black plastic box. That is the waste toner bottle.
Carefully pull the bottle out making sure to do so with a nice smooth motion as the bottle is full of toner which can easily be spilled, leaving a mess on your hands and everything else.
Then take a trash sack, wrap it around the waster toner bottle and tie it off. That way if something happens and the bottle gets shaken, jostled or dropped, you won’t have toner go everywhere.
Now that you have the old bottle out and safely secured, it’s time to put the new waste toner bottle in the system. The new bottle you should find in a plastic sleeve in a cardboard box. As a side note, if you haven’t put the full waste toner bottle in a bag, you can place it in this sleeve as an alternative it will do just as good a job securing the full waste toner bottle.
Remove the new bottle from the box and from the plastic sleeve, and turn it so the end with green handle is facing you and is the end furthest from the Ricoh copier. Then just slide it in waste toner bottle compartment until you feel or hear a click, letting you know it is secure.
Then, just close the door.
Voila! It is as simple as that!
Relax and pat yourself on the back
Congratulations! You’ve changed the waste toner bottle on your Ricoh copier and you are ready to go!
?
When people say to “read between the lines,” they’re not talking about the lines on copies from a copier. Well, at least we hope not. If you find yourself “reading between the lines” on your copies, don’t worry. Those lines can be quickly and easily removed with just a little bit of knowledge, time and some tools.
The problem
When it comes to Ricoh and Sharp copiers, the culprit producing those lines is most likely dirt on your ADF — that’s the long, narrow glass strip to the left of the main glass — also called a scan slot. With use, as paper moves past the ADF, any scum on the paper, whether that is paper dust, sticky-note glue, grease from your French fries, or (if your copier is in an auto shop motor) motor oil, all of that can get transferred to the ADF, blocking the light from reaching your document and thence making lines.
The solution
Ricoh: Look for a small cleaning cloth typically in a small cubby positioned on the left side toward the top of the copier, and wipe that up and down the ADF. If the residue is particularly stubborn, carefully scrape at it with your fingernail until it busts free and then wipe it again with the cloth.
Sharp: Lift the copier lid and fastened to the bottom-side to the right you should find a small, typically green-colored brush-type tool. Pull it out and pass the brush over the ADF until the dirt is free.
With either copier manufacturer, if the cleaning cloth or tool seems to have grown legs and walked off, any lens cleaning cloth — such as you would use for cleaning glasses — will do the job just as well.
After you have finished cleaning, run a blank sheet through the copier to see if you have any lines. If yes, there is still dirt on the ADF. Take the new copy with the line and line it up with the ADF glass. Where you see the line is where you will find the dirt. Wipe or scrub the area again.
If the line is gone, problem solved! Congratulations!
NOTE: Do not try to clean the glass with any abrasive or with acetone, benzene, ammonia, ethyl alcohol or carbon tetrachloride as these will ruin the glass. Also, directly applying liquid to the glass risks damaging the copier should any liquid slip down into the machine via seams and cracks.
If you take the above measures and are still not able to make those lines on your copies disappear, contact us so we can do our magic or contact your servicing dealer.
If you have any questions about copiers or business technology, give us a call at 405-943-9800.
A penny saved is a penny earned, or so the saying goes.
So if saving mere pennies is an accomplishment, how does 80,000 pennies saved per month sound? That’s what we did for one of our clients, a private university here in Oklahoma City, by implementing a managed print services plan — and that was just with paper. We are not even talking about maintenance and toner costs! You can read more about that at the bottom.
So while you may not be a university with hundreds of printers shuttling reams and reams of paper everyday, there is still lots of money to be saved by following these tips, no matter how large your organization.
1. Print (or save) to PDF, not paper.
If you don’t need it physical, let it remain virtual. Instead of selecting a printer when it comes time to save and distribute your final document, select “Print to PDF.” This way you can preserve your document according to your intended format, save it and slap it in an email or hoist it to the cloud, like Google Drive, for sharing. This way, you can keep the document for your records and share it, without ever using ink, toner or paper.
2. Print in black and white as much as possible.
The cost per click for printing in color can be as much as eight times the cost of black and requires more time and power to use. So it makes sense to save some cents by printing in black and white.
3. Print two pages to one sheet.
A no brainer, but whenever possible, for documents being printed for internal use, duplex print your pages, cutting your paper use by 50 percent.
4. Reduce your margins to increase your margin$$$.
Change your printing margin preference in Microsoft Word from the default of 1.25 inches to 0.75 inch. According to a study by Penn State Green Destiny Council, doing so could reduce your paper usage by 4.75 percent. See how reducing your margins can increase your profit margins?
5. Use a toner-sipping font.
According to CNET.com, Century Gothic, Ecofont and Times Roman are among the most economical fonts, and Arial is a toner hog. In tests comparing usage between Century Gothic and Arial, Century Gothic delivered a 31 percent savings over Arial.
6. Proof before you print.
Use print preview and look for layout issues and typographical errors. Just take an extra few seconds to make sure that what you see in the preview is what you want to see on paper. If the image is too big to print on the paper, you can downsize the image to 90 percent or 80 percent or as you need, until the image fits on the page.
7. Print only what you need.
Are you printing from a page online? With scrolling pages being so prevalent on the web these days, its super easy to print Santa’s whole list of good and bad boys and girls, when all you need is little Sally’s and Junior’s names. When you select to print and your print dialogue box appears, make sure you specify only the pages you want to print.
8. Don’t be a copy cat. Scan.
On your multi-function printing device, use your scan to email function. Instead of copying a document to share with someone, scan it and email it to them directly from the copier. Not only do you save paper and toner, you give that person accessibility to the document from anywhere they have email. Don’t know how to scan to email?
Maybe this short tutorial about how to do it on the Ricoh 301 will help:
9. Pause with the print button, please.
Did you hit the print button but nothing happened? Before you hit it again, look for any printer notifications on your screen. If nothing is there, check out the machine. It may need paper or toner. You don’t want to get nine copies of whatever you were printing once the issue is resolved just because you hit the print button eight more times expecting different results.
10. Put your printer to sleep.
As most other appliances and electronics, copiers and printers consume energy when they’re running. Stop this by setting your device to sleep when not in use and when you’re away, like during weekends and holidays. Check your device manual and see how you can set up its “sleep” mode. A good practice is to let it sleep after 15 minutes of non-use.
11. Minimize or eliminate personal printers.
Consolidate your smaller, individual printing devices into a fewer multifunction printers (MFPs) to be shared in your office space. These larger devices are more efficient than their smaller counterparts, are more easily maintained and more customizable for setting usage permissions.
12. Implement a managed print services (MPS) solution.
Doing so could have the highest impact of all the above-mentioned measures and is an easy way accomplish the last tip — consolidating your printing environment. Basically, under MPS, your office technology provider will work with you to optimize, maintain and monitor your printing environment for greatest efficiency and productivity. For example, with the university we mentioned at the head of the blog, we performed a facility walk-through, visiting every device, mapping their locations and entering all the data into a special software. In the end, we determined we could reduce the fleet by two-thirds, drastically reducing costs, maintenance-load and increasing efficiency and the ability to track expenses.
Hopefully, you find these hints helpful and with them you’ll be able to save bundles of dollars and lots of cents.
If you would like more information on how to save printing costs at your business or to learn more about managed print solutions, contact us.