Why lease a copier versus buy a copier? Which is better? What is the difference between buying and leasing and which is better for me? These are questions many businesses and organizations ask when seeking new office technology. Perhaps these are your questions too.
The answer is … well … complicated and it depends on your situation.
First, let’s take a look at the pros and the cons to leasing and buying office equipment.
Leasing a Copier: The Pros
Leasing keeps your equipment up-to-date. We’ve all bought computers, cameras, phones and other technology, thinking we were getting the next and greatest technological wonder, only to discover that such-and-such company just released one better, faster and more user friendly. Frustrating, isn’t it? Well, with leasing you can get the copier or whatever tech you need and at the expiration of the lease, say, three years later, get the newer, faster and more efficient piece of tech. This can help you keep your equipment and network current and talking with whatever new Windows or Mac OS updates may have been released.
You’ll have predictable monthly payments — making for easier budgeting. This benefit is especially attractive to organizations with limited budgets as money is typically tight. The monthly payment makes keeping up with costs more bite-sized and manageable.
You don’t have a large payment upfront, if any at all. There is generally less expense upfront leasing than buying. It’s just your monthly payment. Plain and simple.
You can free up money to get other technology. Because you are not draining your financial coffers with big purchases, the extra money made available you can invest into a network upgrade, a new data back-up and recovery system or even a voice over internet protocol (VoIP) phone system. Shameless plug here: Yup. We can help you with all that too.
Leasing a Copier: The Cons
You’ll have extra financing fees. Generally, but not always, much like leasing or renting almost anything else, you end up paying more while leasing than you would have if you had just bought the equipment outright.
You still have to pay for it, even if you don’t use it. A slow economy or other circumstances may forcecompanies to trim their workforce. With less staff, some organizations may find some of their copiers going unused. That said, during our most recent economic downturns, we saw companies renegotiate their leases with us to allow for less expensive equipment or a fleet reduction, lessening their costs. We’re flexible, but other dealers may not be. Be sure to ask before you sign.
Your selection of desired equipment may be limited depending on what the leasing company will fund. Your dealer should let you know of any limitations if any are present.
Buying a Copier: The Pros
It’s just plain easier. You know what you want. You find it. You buy it. No lease paperwork. You don’t always have to share financial information as you must in leasing. No giving of sensitive information concerning how and where the equipment will be used. No complicated lease conditions. You just get what you want. End of story.
You control your equipment maintenance schedule. In most cases, leasing companies often require you to do maintenance on their schedule according to their specifications as ultimately, the equipment is theirs and they want to protect their investment. Conversely, with you as the owner, it’s your equipment and you’ll do with your investment however you like. This is a bit different with R.K. Black. As a servicing dealer, whether or not the equipment is purchased or leased has no effect on the way we service equipment. It depends on how our service agreement is set up.
You get what you want. You’re not limited by the leasing company’s stock. You can get the brand or model you want, depending on what the dealer can get you. In our case, the leasing company does not limit us. We can lease any of the business or office equipment we sell and the leasing company does not stock any equipment other than lease returns which they can only wholesale.
Buying a Copier: The Cons
You tie up a lot of money and have a higher initial cost. Some pieces of equipment are just too pricey to purchase them outright and may deplete funds that could be used on other aspects of your organization or other technology assets. Going to a lower-cost option in order to save your company money may give you less than favorable results. With leasing you could get what you need and not be out tons of money.
You bought it, you own it, but now it’s old and you’re stuck with it. Everyone knows technology is growing at an exponential rate, so now more than ever, by the time your equipment has “paid for itself,” it’s obsolete and it’s time to replace it. The trouble is, you’ve got a dinosaur you can’t use, others won’t take or, let alone, buy.
Summing up: Figure out what you need and what you’re getting
It all boils down to what you are looking for and what your organization needs. Do your homework. Talk to your company’s finance people to see what you can afford, your tax preparer to see if leasing or buying would better serve you and ask lots of questions.
Now when you have those details figured out and are talking to a technology solutions provider, ask the following questions:
What kind of lease am I signing? If it’s a capital lease, it’s like a hybrid of a lease and ownership. Rent to own, if you will. You have the benefits of being able to make predictable monthly payments, much like a loan, and calling the equipment yours and are thence able to depreciate it, but at the cost of owning soon obsolete and eventually unusable equipment. With an operating lease, the leasing entity owns the equipment.
What is the lease’s term? Leases generally run from 12 to 60 months, depending on what a business needs. Usually, the longer your lease term, the smaller the monthly payments — but much like a home mortgage, you end up paying more in the long run.
Is the lease flexible in case my company grows or retracts? Generally, your leasing agency will work with you. The term of your lease may change, but your monthly bill will very likely reflect the differences. Remember to ask this before you sign!
What happens if I need to get out of my lease or upgrade? Again, make sure to ask this question before you sign. Find out if you can pay off your lease early. Often there’s a penalty for terminating early. In the case of termination, if you want to get out early, you will likely be accessed a string of payments and a penalty.
Do I have a buyout option? With a fair market value buy-out option, at the end of the lease period you can return, upgrade or buy the equipment. For the latter, as an example, if you lease equipment whose value is $10,000 and the fair market value in the end is $3,000, you can purchase the equipment for the fair market value. We generally recommend against this, as any technology these days is obsolete within 18 months of its acquisition. On the other side is the $1 buyout option, which is essentially a lease to own agreement, but with a higher monthly lease payment. We usually recommend against this as well due to obsolescence and the higher lease price.
Will I have to insure the equipment? If you are leasing, generally, yes. You’ll have to factor this cost into your monthly spend, but as most businesses or organizations have standard insurance, most office equipment will fall under that policy. But in any case, ask your insurance company if this is true for your situation.
Summary
If you are asking yourself why lease a copier versus buy one, ask yourself these questions: What are your needs? What is your financial situation? Where do you expect or want your organization to be in the near future? If you are small and don’t see any growth or need for upgrades in the near future and you have the money, you may want to purchase, but if you need lots of technology, see potential for growth and can use your funds for other aspects of your organization, consider leasing. There you have it.
If you have any questions about business equipment, or leasing or buying a copier, give us a call at 405-943-9800.
More and more, people are asking us if their copier or printer supports AirPrint, Apple’s technology that allows people to print wirelessly from their Mac, iPhone, iPad, or iPod device.
It’s a valid question as while AirPrint is built into most current printers and copiers, there are obviously some brands and models that are not AirPrint capable.
So if you are our client and as such are wondering whether your Canon, HP, Kyocera, Lexmark, Ricoh or Sharp device is blessed with AirPrint or not, wonder no more! Or even if you are not our client — yet again, wonder no more!
Check Apple’s list of AirPrint enabled devices
Click HERE to see a handy dandy list Apple has compiled of the printers and print servers that support AirPrint.
As it’s sorted by manufacturer, it’s fairly easy to navigate and to find your particular device, if it’s there.
Apple keeps the list up-to-date, so if the machine you are looking for is on that list, it supports AirPrint. If it is not on that list, it does not — regardless of what the copier or printer manufacturer says.
On the list, but no banana? Get help.
If your device is AirPrint-enabled but it seems the technology is not working, let your IT services people know and if you subscribe to our managed IT support services, be sure to reach out to us.
Hopefully this helped … because that’s what we do. We are here to help.
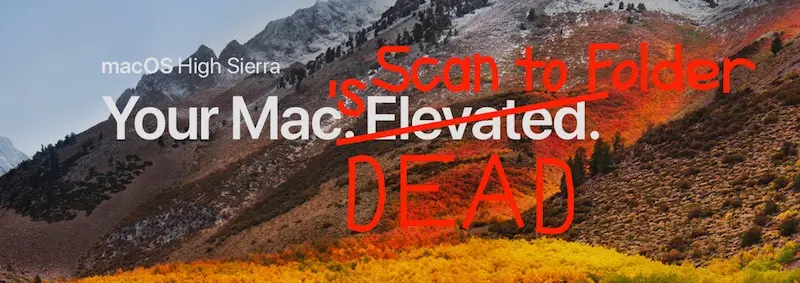
Scan to folder for Macs is dead, or nearly so, thanks to Apple’s macOS High Sierra release.
Mac users accustomed to scanning documents on their office copiers and document scanners and sending them to their PCs were surprised when after updating their machines to Apple’s new OS they found they no longer could scan to folder using FTP.
Why? Because with the release of macOS High Sierra, Apple officially discontinued its support for FTP scanning making the ability to “scan to folder” from the copier no longer an option.
While the omission dealt death to the functionality, borrowing the line from great 80s classic “Princess Bride,” take heart — scan to folder is only MOSTLY dead.
As Billy Crystal remarked then that “mostly dead is slightly alive,” so we say about FTP scanning and Macs. The relationship is still slightly alive thanks to some alternative products now available, depending on your equipment.
Here are some of those solutions:
Kyocera: KYOCERA’s PinPoint Scan Application makes scanning from you PC or Mac from a networked KYOCERA MFP (with HyPAS) easy, fast and versatile. Despite “Scan-megaddon”, this technology still works. Any of our clients who have this app will be unaffected by the change. We have several clients out there with this already, and it’s a relatively modestly priced.
Sharp: Sharp’s AIP Connect platform has connectors for Microsoft’s Exchange, OneDrive and Sharepoint, Network Folders, OnBase and Blackboard from many Sharp MFP devices. While it’s more expensive than PinPoint, it works, and it will bypass the Mac vs. FTP problem.
Ricoh: At this time Ricoh does not have a direct answer to this problem; however, the best answer solution Ricoh provides is the I.C.E. Suite, which allows direct scanning into all cloud-based repositories, such as Dropbox, email (Office 365 or Google Apps), and Google Drive.
Canon: Like Ricoh, Canon offers no direct solution. That said, they have their own version of I.C.E (Cloud Scanning Support), and they also have a mobile scanning solution available.?
Apple: Another solution your IT solutions team may look at is Apple’s own FTP App downloadable for $3.99 from the Mac App store. According to the product description, the app allows the exchange of files between your computers and other devices, via a TCP-based network. Here are the details, but make sure to talk with your IT professional before making any changes.
So why did Apple make this change and bring on the Mac/FTP-pocalypse? One theory is that as historically people used scan-to-folder as files were too big to attach to emails, the advent of cloud document solutions such as Google Drive and Drop Box have rendered the technology obselete as now you can upload a document to the cloud and then send a link.
Due to this, Apple may have reasoned scan-to-folder was no longer necessarily and therefor destined to die. That’s why the company, with its fall 2017 OS release, played the Six-Fingered Man and subjected scan-to-folder to The Machine and drained the life from it, at least on the Apple platform.
If you need a Miracle Max to bring your Mac-FTP capability back to life for your business, reach out to your IT/ network support team. They should be able to least help hook you up with a solution that will work with Google Drive or DropBox which should meet your scanning needs for large and small files and work the various with copier and scanner manufacturers.
Hopefully, this has been helpful to you.
WARNING: shameless plug here: You can always reach out to us and our managed IT support team. We’ve been in the office technology business since 1952, so we know copiers, scanners, networks and, well, pretty much anything (or if not, are always up to learn) when it comes to document and office technology … so if you need a hand, let us know.
A penny saved is a penny earned, or so the saying goes.
So if saving mere pennies is an accomplishment, how does 80,000 pennies saved per month sound? That’s what we did for one of our clients, a private university here in Oklahoma City, by implementing a managed print services plan — and that was just with paper. We are not even talking about maintenance and toner costs! You can read more about that at the bottom.
So while you may not be a university with hundreds of printers shuttling reams and reams of paper everyday, there is still lots of money to be saved by following these tips, no matter how large your organization.
1. Print (or save) to PDF, not paper.
If you don’t need it physical, let it remain virtual. Instead of selecting a printer when it comes time to save and distribute your final document, select “Print to PDF.” This way you can preserve your document according to your intended format, save it and slap it in an email or hoist it to the cloud, like Google Drive, for sharing. This way, you can keep the document for your records and share it, without ever using ink, toner or paper.
2. Print in black and white as much as possible.
The cost per click for printing in color can be as much as eight times the cost of black and requires more time and power to use. So it makes sense to save some cents by printing in black and white.
3. Print two pages to one sheet.
A no brainer, but whenever possible, for documents being printed for internal use, duplex print your pages, cutting your paper use by 50 percent.
4. Reduce your margins to increase your margin$$$.
Change your printing margin preference in Microsoft Word from the default of 1.25 inches to 0.75 inch. According to a study by Penn State Green Destiny Council, doing so could reduce your paper usage by 4.75 percent. See how reducing your margins can increase your profit margins?
5. Use a toner-sipping font.
According to CNET.com, Century Gothic, Ecofont and Times Roman are among the most economical fonts, and Arial is a toner hog. In tests comparing usage between Century Gothic and Arial, Century Gothic delivered a 31 percent savings over Arial.
6. Proof before you print.
Use print preview and look for layout issues and typographical errors. Just take an extra few seconds to make sure that what you see in the preview is what you want to see on paper. If the image is too big to print on the paper, you can downsize the image to 90 percent or 80 percent or as you need, until the image fits on the page.
7. Print only what you need.
Are you printing from a page online? With scrolling pages being so prevalent on the web these days, its super easy to print Santa’s whole list of good and bad boys and girls, when all you need is little Sally’s and Junior’s names. When you select to print and your print dialogue box appears, make sure you specify only the pages you want to print.
8. Don’t be a copy cat. Scan.
On your multi-function printing device, use your scan to email function. Instead of copying a document to share with someone, scan it and email it to them directly from the copier. Not only do you save paper and toner, you give that person accessibility to the document from anywhere they have email. Don’t know how to scan to email?
Maybe this short tutorial about how to do it on the Ricoh 301 will help:
9. Pause with the print button, please.
Did you hit the print button but nothing happened? Before you hit it again, look for any printer notifications on your screen. If nothing is there, check out the machine. It may need paper or toner. You don’t want to get nine copies of whatever you were printing once the issue is resolved just because you hit the print button eight more times expecting different results.
10. Put your printer to sleep.
As most other appliances and electronics, copiers and printers consume energy when they’re running. Stop this by setting your device to sleep when not in use and when you’re away, like during weekends and holidays. Check your device manual and see how you can set up its “sleep” mode. A good practice is to let it sleep after 15 minutes of non-use.
11. Minimize or eliminate personal printers.
Consolidate your smaller, individual printing devices into a fewer multifunction printers (MFPs) to be shared in your office space. These larger devices are more efficient than their smaller counterparts, are more easily maintained and more customizable for setting usage permissions.
12. Implement a managed print services (MPS) solution.
Doing so could have the highest impact of all the above-mentioned measures and is an easy way accomplish the last tip — consolidating your printing environment. Basically, under MPS, your office technology provider will work with you to optimize, maintain and monitor your printing environment for greatest efficiency and productivity. For example, with the university we mentioned at the head of the blog, we performed a facility walk-through, visiting every device, mapping their locations and entering all the data into a special software. In the end, we determined we could reduce the fleet by two-thirds, drastically reducing costs, maintenance-load and increasing efficiency and the ability to track expenses.
Hopefully, you find these hints helpful and with them you’ll be able to save bundles of dollars and lots of cents.
If you would like more information on how to save printing costs at your business or to learn more about managed print solutions, contact us.
Have you ever submitted a job to a print shop only to get a call or an email back saying the file you sent needed this or that before it could be printed? And to make matters worse, the person on the other end began throwing terms at you like DPI, CMYK, bleeds and such, and you thought: “What? Brochures bleed?”
Well, yes they do. Sort of. We’ll explain that here in just a bit.
If you find yourself scratching your head, you’re not alone.
So to save you time, confusion and get you some handsome prints, here’s some help from R.K. Black Office, our print shop in Edmond.
Things you should know as you prepare your artwork for printing:
1. DPI
Dots per inch is a measure in print resolution. This is different from digital resolution which is measured in pixels per inch (typically 72 PPI or DPI). For print projects, always go with at least 300 DPI for the final output size. This ensures your artwork will print tack sharp and without pixilation. That said, you can’t take a 72 DPI digital image, increase it to 300 DPI and it look good. This will only increase the file size. Create, edit and print in at least 300 DPI for printing projects.
2. CMYK
This refers to four-color process printing using four colors:
Cyan (CMYK) C = Cyan
Magenta (CMYK) M = Magenta
Yellow (CMYK) Y = Yellow
Black (CMYK) K = Black
Printers print colors by mixing varying values of these four hues. To ensure your material is printed using the exact colors you desire, convert your files to be printed to CMYK before sending them to your printer. If you don’t, your printer will likely return the files requesting you to do so. Also consider when using pantone colors, the printer will never be able to duplicate them on a CMYK system because it is a CMYK system and not a pantone system.
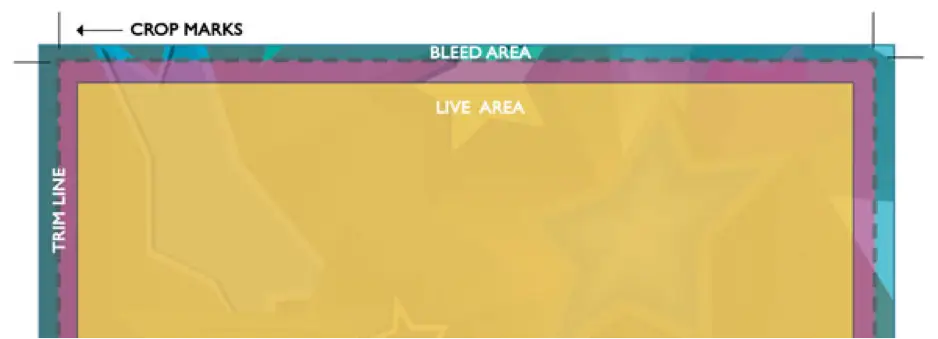
3. Bleed
This is the printed area extending past the page borders, the final document’s edges, as indicated by the blue lines in the above picture. Keep bleeds in mind when you are designing your artwork. If your artwork has a white border, then bleeds are not required. However, if your artwork is NOT white on all four sides, then you MUST include bleeds in your files. This area should be extended past the page borders, as indicated by the blue lines in the above picture. Most of your desktop publishing software such as Adobe InDesign have bleed settings already built in. All you have to do is go into your project’s settings and adjust or turn on or off the bleeds and the crop marks. (Refer to diagram of a typical document for print designs.)
Print Layout Diagram (detailing print terms: bleed, crop marks, live area, trim line)
4. Crop Marks
These marks look like right angles positioned near the corners of your document. They indicate the intersections of the trim lines — where the paper should be cut. As mentioned above, you can typically turn these on or off in your publishing software’s settings.
5. Crop Marks Area
This is the finished size of the piece after it’s been printed and cropped. It’s the area between the crop marks.
6. Live Area
This is the space considered safe to keep any important information within. For example, if a magazine’s trim size is 8.5 in × 11 in, the live area might be 8.0 in × 9.5 in. This area takes into consideration the binding if the art is placed on the left or right of a spread and you don’t want copy to be unreadable if it is too close to the spine.
7. Paper Types
The kind of paper on which a project is printed greatly affects its looks, the paper having the power to change the colors and product’s overall apparent quality. Generally, your papers are either coated or uncoated, matte or glossy. As an example, typical copier paper is uncoated 20-pound text as opposed to the more quality look and feel of the coated paper you would find in a magazine.
Here are some suggestions of papers to use with various printing products. Of course, remember to consult with you printer:
Brochure: 80-lb. gloss text
Flyer: 80 lb. gloss text
Magazine: 80 lb. gloss text
Business Cards: 14 point cardstock, coated or uncoated
Cards (postcards, invitations, thank you, greeting): 14 point cardstock, coated or uncoated. A UV coat brings additional glossiness.
Poster: 100 lb. gloss cover. You have an option to mount on foam core board like for a presentation.
Things you should do before you send a document for printing:
1. Check your bleeds
Include a bleed on all four sides of your document if you want your image to run off the page, such as for a magazine or a picture runs the image off the paper. Printers can’t print to the edge of the paper. That’s why they must print larger than the actual document size so the extra can be trimmed to the finished size and edge–to-edge printing. The standard bleed is 1/8 in. or .125 in. on all four sides.
2. Mind the gap.
Or rather, in printing vernacular, check your borders and safe areas. The cutting process for printed materials has a mechanical tolerance of about .0625 or 1/16 of an inch. When using a border in your artwork, it is essential that your design use at least .125 or 1/8 of an inch of white space from your border to the cut line to maintain a symmetrical appearance. It is also imperative that no text or essential parts of your artwork come within 1/16″ of the trim line. Again, due to the mechanical tolerance during the cutting process, any content within 1/16″ of the trim line may be cut off.
3. Convert to CMYK.
Remember when printing a four-color process job to convert all images and colors to CMYK (cyan, magenta, yellow, black), as opposed to RGB (red, green, blue).
4. Print to PDF.
When possible, send PDF Files for print. A PDF locks your project’s formatting and fonts so they stay the same, no matter who sees them or on what device. This best ensures the document will print as you see it when you send. By contrast, a Word document will change according to the settings of the computer upon which it is opened. The computer may substitute fonts, margins and layout according to its settings, not yours.
Creating a PDF with Adobe Acrobat Professional (download free trial version)
A PDF file can be created using many different methods. Some applications use a built-in PDF converter while others do not have this functionality at all.
However, if you have Adobe Acrobat Professional (this is not the same as Adobe Acrobat Reader), you can create a PDF from ANY application that supports printing. To create a PDF, simply choose “Adobe PDF” as your printer and choose the “Press Quality” preset when printing to the Adobe PDF printer. If using the preset, no further action is necessary.
5. Package your file.
This will put your images and fonts into one package that will travel with the file so your printer doesn’t lose time having to search for new images or fonts. You can do this easily in Adobe InDesign. Don’t know how to do this? Google “How to package an InDesign file” and you’ll have plenty of instructions from which to choose.
Packaging InDesign Files
PREFLIGHT: The Preflight option allows InDesign to check your files for common printing errors and help you solve them. To use this feature, simply choose “Preflight” from the file menu.
PACKAGE: Please resolve any issues detected by the preflight process. Once InDesign detects no errors, please choose “Package” either from the File Menu, or by pushing the “Package” button on the preflight screen above. On this screen, please make sure the to check Copy Fonts, Copy Linked Graphics, and Update Graphic Links in Package – then click Package.
Though by no means is this an exhaustive guide to preparing your projects for print, hopefully this gives you a leg up so next time you’re working on a project, you’re all set to send your local shop a truly print-ready file and to talk shop — print shop, that is.
About R.K. Black, Inc.
R.K. Black, Inc. is an Oklahoma City-based, family-owned leading provider of office technology solutions to businesses in Oklahoma and Kansas. We specialize in everything business technology from copier, fax, printer and scanner technology to document management, onsite paper shredding services, VoIP phone systems and managed IT support to video surveillance solutions.
If you want to learn more about us, feel free to explore the website, read our other blogs or click the button below to be contacted by one of our reps and tell you! Also, be sure to keep watching our social media channels on Facebook and Twitter for more business tips from our blog.
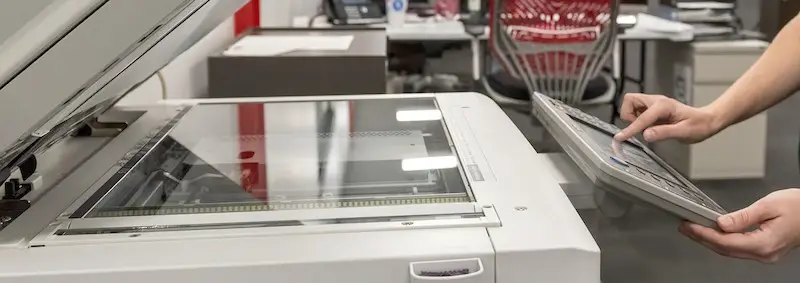
Question: Is it bad to leave the copier lid up?
Answer: In the old days of the analogue copier, it was bad as the machine’s mirrors would direct any light to the photosensitive drum, exposing it and ruining it.
Now-a-days with digital technology, it is only bad if the lid is left open while copying. While current technology makes the machine’s optics and mirrors only active during the copying process, if the lid is left open during operation the copier uses more toner.
As explained by our field service supervisor Derek Bendure, when you make a copy of a 8″x11″ sheet, for example, and leave the lid open, everything that doesn’t reflect copier’s scanning light is then read as black. This in turn the copier interprets as space to reproduce in black, dramatically increasing the usage of toner from a document’s typical 5percent fill to 100 percent — twenty times more toner.
“You are using way more toner then you should and that’s expensive,” explained Bendure, adding also that the process prematurely wears outthe drum and the fuser.
In short, while leaving the lid open is not as bad as it once was with older technology, it may result in unnecessary expenses in toner and copier parts. So, yes, it’s bad.
If any of this sounds good to you or like something you might be interested in implementing at your business, contact us! Also, be sure to keep watching our social media channels on Facebook and Twitter for more business tips from our blog.


 Print Layout Diagram (detailing print terms: bleed, crop marks, live area, trim line)
4. Crop Marks
These marks look like right angles positioned near the corners of your document. They indicate the intersections of the trim lines — where the paper should be cut. As mentioned above, you can typically turn these on or off in your publishing software’s settings.
5. Crop Marks Area
This is the finished size of the piece after it’s been printed and cropped. It’s the area between the crop marks.
6. Live Area
This is the space considered safe to keep any important information within. For example, if a magazine’s trim size is 8.5 in × 11 in, the live area might be 8.0 in × 9.5 in. This area takes into consideration the binding if the art is placed on the left or right of a spread and you don’t want copy to be unreadable if it is too close to the spine.
7. Paper Types
The kind of paper on which a project is printed greatly affects its looks, the paper having the power to change the colors and product’s overall apparent quality. Generally, your papers are either coated or uncoated, matte or glossy. As an example, typical copier paper is uncoated 20-pound text as opposed to the more quality look and feel of the coated paper you would find in a magazine.
Here are some suggestions of papers to use with various printing products. Of course, remember to consult with you printer:
Brochure: 80-lb. gloss text
Flyer: 80 lb. gloss text
Magazine: 80 lb. gloss text
Business Cards: 14 point cardstock, coated or uncoated
Cards (postcards, invitations, thank you, greeting): 14 point cardstock, coated or uncoated. A UV coat brings additional glossiness.
Poster: 100 lb. gloss cover. You have an option to mount on foam core board like for a presentation.
Things you should do before you send a document for printing:
1. Check your bleeds
Include a bleed on all four sides of your document if you want your image to run off the page, such as for a magazine or a picture runs the image off the paper. Printers can’t print to the edge of the paper. That’s why they must print larger than the actual document size so the extra can be trimmed to the finished size and edge–to-edge printing. The standard bleed is 1/8 in. or .125 in. on all four sides.
2. Mind the gap.
Or rather, in printing vernacular, check your borders and safe areas. The cutting process for printed materials has a mechanical tolerance of about .0625 or 1/16 of an inch. When using a border in your artwork, it is essential that your design use at least .125 or 1/8 of an inch of white space from your border to the cut line to maintain a symmetrical appearance. It is also imperative that no text or essential parts of your artwork come within 1/16″ of the trim line. Again, due to the mechanical tolerance during the cutting process, any content within 1/16″ of the trim line may be cut off.
3. Convert to CMYK.
Remember when printing a four-color process job to convert all images and colors to CMYK (cyan, magenta, yellow, black), as opposed to RGB (red, green, blue).
4. Print to PDF.
When possible, send PDF Files for print. A PDF locks your project’s formatting and fonts so they stay the same, no matter who sees them or on what device. This best ensures the document will print as you see it when you send. By contrast, a Word document will change according to the settings of the computer upon which it is opened. The computer may substitute fonts, margins and layout according to its settings, not yours.
Creating a PDF with Adobe Acrobat Professional (download free trial version)
A PDF file can be created using many different methods. Some applications use a built-in PDF converter while others do not have this functionality at all.
However, if you have Adobe Acrobat Professional (this is not the same as Adobe Acrobat Reader), you can create a PDF from ANY application that supports printing. To create a PDF, simply choose “Adobe PDF” as your printer and choose the “Press Quality” preset when printing to the Adobe PDF printer. If using the preset, no further action is necessary.
5. Package your file.
This will put your images and fonts into one package that will travel with the file so your printer doesn’t lose time having to search for new images or fonts. You can do this easily in Adobe InDesign. Don’t know how to do this? Google “How to package an InDesign file” and you’ll have plenty of instructions from which to choose.
Packaging InDesign Files
PREFLIGHT: The Preflight option allows InDesign to check your files for common printing errors and help you solve them. To use this feature, simply choose “Preflight” from the file menu.
PACKAGE: Please resolve any issues detected by the preflight process. Once InDesign detects no errors, please choose “Package” either from the File Menu, or by pushing the “Package” button on the preflight screen above. On this screen, please make sure the to check Copy Fonts, Copy Linked Graphics, and Update Graphic Links in Package – then click Package.
Though by no means is this an exhaustive guide to preparing your projects for print, hopefully this gives you a leg up so next time you’re working on a project, you’re all set to send your local shop a truly print-ready file and to talk shop — print shop, that is.
Print Layout Diagram (detailing print terms: bleed, crop marks, live area, trim line)
4. Crop Marks
These marks look like right angles positioned near the corners of your document. They indicate the intersections of the trim lines — where the paper should be cut. As mentioned above, you can typically turn these on or off in your publishing software’s settings.
5. Crop Marks Area
This is the finished size of the piece after it’s been printed and cropped. It’s the area between the crop marks.
6. Live Area
This is the space considered safe to keep any important information within. For example, if a magazine’s trim size is 8.5 in × 11 in, the live area might be 8.0 in × 9.5 in. This area takes into consideration the binding if the art is placed on the left or right of a spread and you don’t want copy to be unreadable if it is too close to the spine.
7. Paper Types
The kind of paper on which a project is printed greatly affects its looks, the paper having the power to change the colors and product’s overall apparent quality. Generally, your papers are either coated or uncoated, matte or glossy. As an example, typical copier paper is uncoated 20-pound text as opposed to the more quality look and feel of the coated paper you would find in a magazine.
Here are some suggestions of papers to use with various printing products. Of course, remember to consult with you printer:
Brochure: 80-lb. gloss text
Flyer: 80 lb. gloss text
Magazine: 80 lb. gloss text
Business Cards: 14 point cardstock, coated or uncoated
Cards (postcards, invitations, thank you, greeting): 14 point cardstock, coated or uncoated. A UV coat brings additional glossiness.
Poster: 100 lb. gloss cover. You have an option to mount on foam core board like for a presentation.
Things you should do before you send a document for printing:
1. Check your bleeds
Include a bleed on all four sides of your document if you want your image to run off the page, such as for a magazine or a picture runs the image off the paper. Printers can’t print to the edge of the paper. That’s why they must print larger than the actual document size so the extra can be trimmed to the finished size and edge–to-edge printing. The standard bleed is 1/8 in. or .125 in. on all four sides.
2. Mind the gap.
Or rather, in printing vernacular, check your borders and safe areas. The cutting process for printed materials has a mechanical tolerance of about .0625 or 1/16 of an inch. When using a border in your artwork, it is essential that your design use at least .125 or 1/8 of an inch of white space from your border to the cut line to maintain a symmetrical appearance. It is also imperative that no text or essential parts of your artwork come within 1/16″ of the trim line. Again, due to the mechanical tolerance during the cutting process, any content within 1/16″ of the trim line may be cut off.
3. Convert to CMYK.
Remember when printing a four-color process job to convert all images and colors to CMYK (cyan, magenta, yellow, black), as opposed to RGB (red, green, blue).
4. Print to PDF.
When possible, send PDF Files for print. A PDF locks your project’s formatting and fonts so they stay the same, no matter who sees them or on what device. This best ensures the document will print as you see it when you send. By contrast, a Word document will change according to the settings of the computer upon which it is opened. The computer may substitute fonts, margins and layout according to its settings, not yours.
Creating a PDF with Adobe Acrobat Professional (download free trial version)
A PDF file can be created using many different methods. Some applications use a built-in PDF converter while others do not have this functionality at all.
However, if you have Adobe Acrobat Professional (this is not the same as Adobe Acrobat Reader), you can create a PDF from ANY application that supports printing. To create a PDF, simply choose “Adobe PDF” as your printer and choose the “Press Quality” preset when printing to the Adobe PDF printer. If using the preset, no further action is necessary.
5. Package your file.
This will put your images and fonts into one package that will travel with the file so your printer doesn’t lose time having to search for new images or fonts. You can do this easily in Adobe InDesign. Don’t know how to do this? Google “How to package an InDesign file” and you’ll have plenty of instructions from which to choose.
Packaging InDesign Files
PREFLIGHT: The Preflight option allows InDesign to check your files for common printing errors and help you solve them. To use this feature, simply choose “Preflight” from the file menu.
PACKAGE: Please resolve any issues detected by the preflight process. Once InDesign detects no errors, please choose “Package” either from the File Menu, or by pushing the “Package” button on the preflight screen above. On this screen, please make sure the to check Copy Fonts, Copy Linked Graphics, and Update Graphic Links in Package – then click Package.
Though by no means is this an exhaustive guide to preparing your projects for print, hopefully this gives you a leg up so next time you’re working on a project, you’re all set to send your local shop a truly print-ready file and to talk shop — print shop, that is.