Have you ever submitted a job to a print shop only to get a call or an email back saying the file you sent needed this or that before it could be printed? And to make matters worse, the person on the other end began throwing terms at you like DPI, CMYK, bleeds and such, and you thought: “What? Brochures bleed?”
Well, yes they do. Sort of. We'll explain that here in just a bit.
If you find yourself scratching your head, you're not alone.
So to save you time, confusion and get you some handsome prints, here's some help from R.K. Black Office, our print shop in Edmond.
Things you should know as you prepare your artwork for printing:
1. DPI
Dots per inch is a measure in print resolution. This is different from digital resolution which is measured in pixels per inch (typically 72 PPI or DPI). For print projects, always go with at least 300 DPI for the final output size. This ensures your artwork will print tack sharp and without pixilation. That said, you can’t take a 72 DPI digital image, increase it to 300 DPI and it look good. This will only increase the file size. Create, edit and print in at least 300 DPI for printing projects.
2. CMYK
This refers to four-color process printing using four colors:
 C = Cyan
 M = Magenta
 Y = Yellow
 K = Black
Printers print colors by mixing varying values of these four hues. To ensure your material is printed using the exact colors you desire, convert your files to be printed to CMYK before sending them to your printer. If you don’t, your printer will likely return the files requesting you to do so. Also consider when using pantone colors, the printer will never be able to duplicate them on a CMYK system because it is a CMYK system and not a pantone system.
3. Bleed
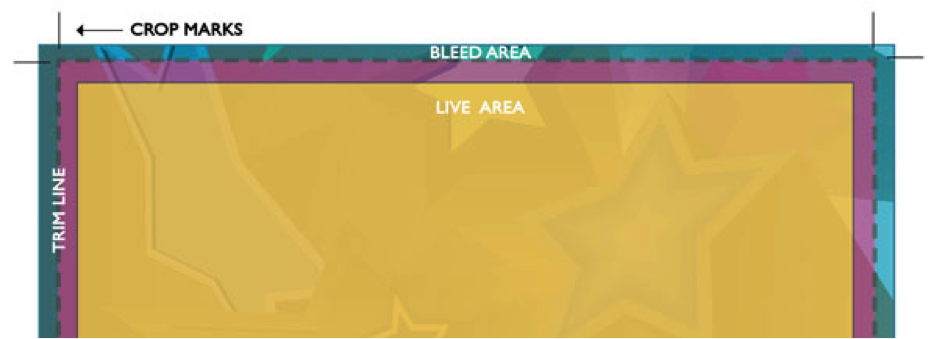
This is the printed area extending past the page borders, the final document’s edges, as indicated by the blue lines in the above picture. Keep bleeds in mind when you are designing your artwork. If your artwork has a white border, then bleeds are not required. However, if your artwork is NOT white on all four sides, then you MUST include bleeds in your files. This area should be extended past the page borders, as indicated by the blue lines in the above picture. Most of your desktop publishing software such as Adobe InDesign have bleed settings already built in. All you have to do is go into your project’s settings and adjust or turn on or off the bleeds and the crop marks. (Refer to diagram of a typical document for print designs.)

4. Crop Marks
These marks look like right angles positioned near the corners of your document. They indicate the intersections of the trim lines — where the paper should be cut. As mentioned above, you can typically turn these on or off in your publishing software’s settings.
5. Crop Marks Area
This is the finished size of the piece after it’s been printed and cropped. It’s the area between the crop marks.
6. Live Area
This is the space considered safe to keep any important information within. For example, if a magazine’s trim size is 8.5 in × 11 in, the live area might be 8.0 in × 9.5 in. This area takes into consideration the binding if the art is placed on the left or right of a spread and you don’t want copy to be unreadable if it is too close to the spine.
7. Paper Types
The kind of paper on which a project is printed greatly affects its looks, the paper having the power to change the colors and product's overall apparent quality. Generally, your papers are either coated or uncoated, matte or glossy. As an example, typical copier paper is uncoated 20-pound text as opposed to the more quality look and feel of the coated paper you would find in a magazine.
Here are some suggestions of papers to use with various printing products. Of course, remember to consult with you printer:
Brochure: 80-lb. gloss text
Flyer: 80 lb. gloss text
Magazine: 80 lb. gloss text
Business Cards: 14 point cardstock, coated or uncoated
Cards (postcards, invitations, thank you, greeting): 14 point cardstock, coated or uncoated. A UV coat brings additional glossiness.
Poster: 100 lb. gloss cover. You have an option to mount on foam core board like for a presentation.
Things you should do before you send a document for printing:
1. Check your bleeds
Include a bleed on all four sides of your document if you want your image to run off the page, such as for a magazine or a picture runs the image off the paper. Printers can’t print to the edge of the paper. That’s why they must print larger than the actual document size so the extra can be trimmed to the finished size and edge–to-edge printing. The standard bleed is 1/8 in. or .125 in. on all four sides.
2. Mind the gap.
Or rather, in printing vernacular, check your borders and safe areas. The cutting process for printed materials has a mechanical tolerance of about .0625 or 1/16 of an inch. When using a border in your artwork, it is essential that your design use at least .125 or 1/8 of an inch of white space from your border to the cut line to maintain a symmetrical appearance. It is also imperative that no text or essential parts of your artwork come within 1/16" of the trim line. Again, due to the mechanical tolerance during the cutting process, any content within 1/16" of the trim line may be cut off.
3. Convert to CMYK.
Remember when printing a four-color process job to convert all images and colors to CMYK (cyan, magenta, yellow, black), as opposed to RGB (red, green, blue).
4. Print to PDF.
When possible, send PDF Files for print. A PDF locks your project’s formatting and fonts so they stay the same, no matter who sees them or on what device. This best ensures the document will print as you see it when you send. By contrast, a Word document will change according to the settings of the computer upon which it is opened. The computer may substitute fonts, margins and layout according to its settings, not yours.
Creating a PDF with Adobe Acrobat Professional (download free trial version)
A PDF file can be created using many different methods. Some applications use a built-in PDF converter while others do not have this functionality at all.
However, if you have Adobe Acrobat Professional (this is not the same as Adobe Acrobat Reader), you can create a PDF from ANY application that supports printing. To create a PDF, simply choose "Adobe PDF" as your printer and choose the "Press Quality" preset when printing to the Adobe PDF printer. If using the preset, no further action is necessary.
5. Package your file.
This will put your images and fonts into one package that will travel with the file so your printer doesn’t lose time having to search for new images or fonts. You can do this easily in Adobe InDesign. Don’t know how to do this? Google “How to package an InDesign file” and you’ll have plenty of instructions from which to choose.
Packaging InDesign Files
PREFLIGHT: The Preflight option allows InDesign to check your files for common printing errors and help you solve them. To use this feature, simply choose "Preflight" from the file menu.
PACKAGE: Please resolve any issues detected by the preflight process. Once InDesign detects no errors, please choose "Package" either from the File Menu, or by pushing the "Package" button on the preflight screen above. On this screen, please make sure the to check Copy Fonts, Copy Linked Graphics, and Update Graphic Links in Package - then click Package.
Though by no means is this an exhaustive guide to preparing your projects for print, hopefully this gives you a leg up so next time you're working on a project, you're all set to send your local shop a truly print-ready file and to talk shop — print shop, that is.
To see what R.K. Black Office can do for you, click here.
R.K. Black, Inc. is an Oklahoma City-based, family-owned leading provider of office technology solutions to small and medium-sized businesses in and around central Oklahoma. We specialize in everything business technology from copier, fax, printer and scanner technology to document management, onsite paper shredding services, VoIP phone systems and managed IT support to video surveillance solutions.
If you want to learn more about us, feel free to explore the website, read our other blogs or click the button below to be contacted by one of our reps and tell you! Also, be sure to keep watching our social media channels on Facebook and Twitter for more business tips from our blog.
You may notice we don't yet have a website for R.K. Black Office where you can submit a print project — that's because a really cool one is now under development. In the meantime, we are kicking it old school: Call the print shop at 405-974-2301 or email production@rkblack.com or click the button below to have someone contact you.


